Monday, August 4, 2014

Can you smell what The Rock is cooking? Cuz it's cookies!

Sorry… I really just wanted to hide away into my own little world to have some Me time. But I'm back.

My guilty non-girly thing to watch on TV has aways been wrestling… WWE (or as I have known it / for you 90s kids… WWF) wrestling. My youngest cousin discovered WWE about 2, 3 years ago… and wished he grew up watching the Attitude Era (re-watching those matches for me is nostalgic while little funny), because the new stuff is kind tamed. And I digress… I was going through Amazon, and I found the WWE: Can You Take The Heat Cookbook and I added into the shopping cart after my little cousin was egging me to get it. Something happened and I never bought it. Then one day, my mother had to buy something off Amazon, so I helped her make the purchase. I totally forgot that I had the cookbook in the shopping cart, and all after I clicked the "purchase" button and checked my email… I then realized I had just bought the book. Face-palm moment, but so funny. The book is full of the Attitude Era puns and sass, and fairly easy to super easy recipes. Great book to get your little wrestler to help out on making dinner, lunch, and/or dessert.

After receiving the book, I gave it to my youngest cousin and told him "This summer, I want to teach you to cook using this… we have to at least try a few recipes." He approved, and we had to pick my favorite hunky wrestler with the sexy eyebrow and mutton-chops (so sad he shaved that all off)… oh yes… The Rock… with The Rock's Favorite Chocolate Chip Cookie. The recipe… I didn't change anything from it, other than that… I didn't add nuts. Instead of the recommended Hershey chocolate bar that the cookbook calls for, I used Ghirardelli semi-sweet baking bars… which I had my youngest cousin painstakingly shave one bar all by hand, by himself. He hated me for that, but enjoyed the end result. The cookies came out crispy, chocolatey, and delicious. Since I didn't change anything from the original recipe other than the chocolate used, I'm just going to post my scan of the original recipe here.

Please click for better viewing.

This is how our cookies turned out. Want some?

If you like the recipe, and is interested in the cookbook, please click here or the link that I put earlier in the post (which is the same link) to purchase the book. Haha! Total lazy post, I'll do one better next time. Enjoy everyone!

Tuesday, May 6, 2014

Thai Fishcakes Take 1

OMG… 2014… I only made one entry? I've been productive in the kitchen, but nothing is leaving experimental stage. Everything has been off, and it just left me in a slump. Only thing that is going on in my life that has gotten me interested and not in total slump is that my plumeria cuttings are actually growing, and that my Aloha Lily bulbs are growing too (they look like tiny pineapples before they fully mature and bloom)!

Anyhoo~ I was in Chinatown, rummaging through a little tiny bookstore… and found a book on how to cook Thai food. Which had me remember about a little Thai restaurant, that closed long time ago, that served these amazing fried fish cakes. My family had tried to recreate it but with no success. Back to the little bookstore, I flipped through the pages and saw a picture of the fried fish cakes… it looked exactly like the ones I had in the restaurant! I dislike frying food because of the oily feeling after frying and the popping oil burns, and the overall mess in the end. But I have to try this!

I credit the book 爱上cc老师的泰国菜 for it. But wait… why is the title of the entry "take 1"? Well.. because your's truly here did not have the time to better research what "red curry paste" that the chef meant in the cookbook. So I used Patak's (an Indian brand) red curry paste. It did not do much to the fish cake's end result in terms of flavor, just a slightest hint of basic curry flavor. Neither did it provide that distinct redness. Next time I redo this recipe, I will definitely try using red curry paste that is used in Thai dishes. Just to see if there is any differences. Also! Another little note… I hand diced the fish meat and squid/cuttlefish meat into a paste. Also… you have to literally splat the fish-squid paste mix till it is sticky and has a slight bounce to it. It is going to take a while, but it is worth it. So ladies, if you want a good shoulder exercise… and/or have some pent up anger... this is the dish. But if you have a food processor, go for it. My family says that the texture is better if made into a paste by hand. In terms of making them into patties... if you form them by hand then fry it, it will have a light airy chewy texture. If you form them using a spoon then fry it, you'd end up packing it, pushing out the air, thus turning the end product into a hard dense chewy product.

Back four are hand-formed, and the front six are spoon-formed

Ingredients:
300g (about 1.5 lb) red snapper fillet
150g (about 1/3 lb) fresh squid or cuttlefish
8 pieces Chinese long beans, chopped into thin rounds
6 pieces Kaffir lime leaves, really finely chopped
1 egg
1/4 cup corn starch
1/2 tsp baking soda
1.5 tbsp red curry paste
1 tsp fish sauce
1 tbsp cooking rice wine (I used Shao Hing cooking wine)
1/2 tsp white pepper powder
Oil for frying (use peanut oil or canola oil)

How-To:
- Chop and mince into a paste for both the fish fillet and squid/cuttlefish. Put into a big bowl for mixing.
- Into same bowl, add in the chopped long bean, egg, finely chopped lime leaves, fish sauce, corn starch, baking soda, curry paste, cooking rice wine, and white pepper powder.
- Mix everything until well incorporated.
- Now scoop up that blob with your hands, and just throw it down into the bowl like your angry at something! (Screaming "YAHHHHH!" helps, and having someone else take a little turn helps too.)
- Once the blob has a slight bounce to touch, it is ready to be made into a patty. First clean your hands, and wet them to make the patties. This will prevent the sticky mixture from turning your hands into club hands.
- Heat oil over medium-high heat. Once the frying oil is ready (test with a bamboo chopstick for rapid bubbles, sign that it is ready), drop a few patties into the oil. It will puff up a little as it fry. You can gently press the puff down to draw out the moisture. Fry until golden brown.
- Remember to place fried products onto a well-lined plate to draw out excess oil.
- Serve with a sweet vinegar sauce, or a sweet chili sauce.

I wish I tried the sauce recipe that accompanied the fishcakes in the book. May be next time. But I used a sweet chili sauce (Mae Ploy brand), it was just as good. Great for parties. Enjoy everyone!

Saturday, January 25, 2014

Never knew the happiest place on Earth had this, eat your heart out Panda Express

Long time no see everyone! Sorry, I really let myself take sometime out for my microbiology class and recovery from it… which I must say "Yay!!!!! I passed it. Go me!"

During December… well, on New Years days (By the way... Happy 2014 everyone!)… I participated in a Secret Santa party with some friends… And in my Secret Santa Wishlist, I asked for a cookbook named, Chef Micky by Pam Brandon, that had a few choice Disneyland/DisneyWorld/Disney Epcot/Disney Resort recipes. When I oh-so carefully unwrapped my gift, I just jumped for joy when I saw the book. I just knew I had to try something from it. So, thank you Diana for this awesome gift! My only "complaint" is that I wish that the book had the recipe for the clam chowder and/or gumbo served at Disneyland's Royal Street Veranda. OMG I can so go from some right now. Drool~

Anyways, I combed through the book, and thought I try something fairly easy. Okay, I'm a total ABC, but I have never order orange chicken or beef dish in any Chinese restaurant or fast-food chain before. I've heard of the dish, I'm sure I've tried it before, but I've never ordered any on my own. So I thought, "Why the heck not! Wouldn't hurt right?" So I took a stab at the recipe for Orange Beef from the Papeete Bay Veranda at the Disney Polynesian Resort. So here, I will share this one recipe with the world, of course with some of my own additions and changes. In order not to give out the whole book and anger the author for all that she had gone through to compile and publish this fabulous piece of work, I shall refrain with just this one recipe, and if you enjoy the recipe and would like to explore what more the Magic Kingdom has to offer, please purchase the book. (The link is given above.)

I've never been to the Disney Polynesian Resort, so I've never had the dish. I followed the recipe as it is given. The orange sauce is orangey, kind of tangy with a very slight sweetness. Typical orange chicken dish flavor. The original recipe's sauce is very thin and watery. So I added a touch of cornstarch to thicken it. The beef… I wish I knew how to shop for a tender cut of flank steak or beef in general. I will list out the things I replaced or omitted in the ingredients' section. All in all, it is tasty.

I have no plating skills.

Ingredients:
Orange Sauce:
1 tbsp olive oil (I just used regular vegetable oil)
4 scallions, chopped (I just used one large stalk of scallion)
½ tsp crushed red peppers
4 tbsp soy sauce
1 cup orange juice (I just used the brand Simply Orange, but I think fresh squeeze would be better)
2 tbsp sugar (I used regular granulated)
½ cup water
½ tbsp cornstarch + a touch of water (optional step)
4 cups cooked rice, for serving (I thought it was funny how this was listed under the sauce's ingredient list, but I say this can be optional… I ate it as is, no rice. Am I weird?)

Beef:
1 lb flank steak
2 tbsp cornstarch (I just mainly used cornstarch as the dredge)
2 tbsp all-purpose flour (I didn't use this because I did not have any on hand)
2 eggs, beaten
2 tbsp olive oil (I just used vegetable oil)
2 tbsp butter (I had no butter at home, so I omitted this)

How-To:
Orange Sauce:
- Heat olive oil in medium skillet. Sauté scallion and crushed red pepper for 2 minutes.
- Stir together soy sauce, orange juice, sugar, and water, and slowly pour into skillet. Bring to a boil over medium-high heat, stirring frequently, 2 - 3 minutes. Set aside and keep warm while preparing beef. (For myself, because I like a little more sweetness, I sprinkled a little more sugar and added a splash more orange juice. I let the sauce reduce to about half or a little more, stirring frequently. Lower the heat to about medium-low to low heat, and little by little pour the optional cornstarch-water mixture to the desired thickening thickness.)

Beef:
- Slice flank steak into ½-inch strips. (For myself, I cubed the meat for easier eating. I also gently marinaded the meat simply with salt to taste for about 15 minutes or so.)
- Combine cornstarch and flour in a wide shallow bowl. Lightly beat egg in a separate wide shallow bowl.
- Dredge steak in cornstarch and flour, then in beaten eggs. Shake off excess. (For myself, after dredging the meat in the egg, I redredged the meat in the cornstarch. I think I read that doing that makes the final product crispier.)
- Heat oil and butter in large heavy skillet over medium heat. Working in batches, cook steak, then keep warn until ready to serve. (Remember to place freshly fried meat onto a paper towel lined plate to absorb the excess grease!)
- Serve with warmed sauce spooned over steak and rice. (For myself, I just tossed the beef in the sauce to coat every morsel of meaty goodness, and just serve on a plate family-style.)

Seems fairly easy right? I personally dislike frying. I've already got popped by burning oil multiple times while making this… and managed to get oil splatters all over the floor. It was a serious mess. But don't let my experience of frying deter you from trying this recipe. The sauce feels and tastes healthy because unlike most Chinese restaurants and Chinese fast-food chains, there is no MSG, extra salt, and extra oil in this dish, nor does the sauce have the weird gummy gooey texture that some places offer. Good luck everyone! I hope you'll enjoy this recipe!

Monday, October 21, 2013

Chilly weather? Warm up with Spicy Pork (Jeyeuk Bokkum)!!!


Ah~ Finally, the Bay Area is cooling down. I like it! I can finally bust out all my winter fashion and enjoy the cold weather's charm and fun. Some reason, cold weather makes me think of Korean BBQ and/or apple cider. Strange combination... but both majorly delicious. So neglecting to do a hardcore study session for my 2nd microbio exam (which no doubly, I bombed), I decided to do hardcore research into some yummy recipes I can try my hands on (reason for exam failure is because of that).

Do not overlook where you may find an interesting recipe. This month of October, I suddenly fell into a Korean BBQ type of mood. But thinking about Korean food makes me think of all the prep work involved, and that deters me from cooking Korean dishes. Strangely enough during work, I had a small down time and decided to kill it with browsing through some newly delivered magazines before I place them into the waiting room (I work in a doctor's office). I came across a copy of Men's Health (the manly version of Cosmo?), seeing Joseph Gorden-Lovett's smiling cuteness gracing the covers, I decided to flip through. About to give up from all the overload of testosterone-filled-machismo-handsomeness, I managed to flip to a small article about cooking. Closer inspection, it was about cooking Korean food. Much closer inspection, it was about cooking spicy pork (Jeyeuk Bokkum)! Bonus, it was pork belly meat! Being that it is a magazine tailored towards men, it only means that everything was spelled out simply... EASY TO DO! No fuss, No mess. (I'm sorry, I can't seem to find the recipe on Men's Health website. I only have it via hardcopy from the October 2013 issue if you are interested.)

My recipe is adapted and unaltered from that particular issue, therefore I will credit to whom they credited: chef Hooni Kim of Hanjan restaurant in NYC. Only thing I did was double the quality (cuz I cook for a squadron of people, but if you are making for less people or like sensible sizes, just cut the amount by half) and added greeneries (I added zucchini and lettuce... because it was just sitting there in the veggie bin at home, beckoning to be cooked). This is pork belly meat... yes that means bacon. Don't want to forfeit your precious pork belly meat? Buy the pork belly at a good butcher shop, and try to ask for a leaner cut with less fat on it, or you can trim the excess at home yourself. There is a momentary need to wait overnight before eating this dish because of the marinating process. The wait will definitely be worth it. Now... Onward!!!!


Spicy pork belly, two ways: spring roll-style and traditional lettuce leaf wrap

Ingredients:
2lb pork belly slices (unsmoked, halved widthwise, and trimmed of excess fat)
1 large onion (halved, and sliced thinly)
6 tbsp Gochujang
6 tbsp soju (I used Jinro Chamisul. Japanese sake works too)
6 tbsp soy sauce
2 tbsp Mirin
2 tbsp sesame oil
2 tbsp sugar (regular white granulated is fine)
5 - 6 cloves garlic (finely minced)
1 nub ginger (about more or less the length of your thumb, finely minced)
3 - 4 zucchinis (halved widthwise, sliced lengthwise)
salt to taste
1 - 2 head of red leaf lettuce (Destalked into individual leaves, washed, and dried; optional)
1 package rice paper wrap (optional)
Cooked jasmine rice (optional)

How-To:
Night before...

- Prep everything, and then mix items #3 - #10 in a big mixing bowl.
- Add spicy mixture, pork belly slices, and sliced onions into a big gallon-size zip-top bag, squish around to evenly coat meat with spicy mixture, and allow to marinate overnight in refrigerator.

Next day...

- Prep your vegetables.
- Heat a large pan with a touch of sesame oil, and cook zucchini slices. Add a touch of salt. On a plate, transfer cooked zucchini and set aside.
- Using same pan, DO NOT ADD ADDITIONAL OIL (your pork belly will provide it), pan-fry in batches of the pork belly slices as you would bacon until throughly cooked. Do so with all or as much of the pork belly slices as you desire.
- Once done pan-frying pork belly slices, in same pan, add in the cooked zucchini and cooked pork belly. Toss to throughly mix both ingredients, so everything gets smothered in the spicy red sauce. Plate and serve!

Eat it wrapped in the lettuce leaf. As my uncle suggested, wrap the spicy pork in the lettuce leaf, and then wrap it in the rice paper/spring roll wrap... kind of like the Vietnamese fresh spring roll. To use spring roll rice paper wrap, just take a sheet and dunk it in some luke warm to hot water (careful, okay? It is hot water) until it is malleable. Or nix the lettuce leaf and just eat it with the rice paper wrap. Or 86 the wrap-gears and go old fashion with a big bowl of hot, fluffy cooked rice. Which ever way you choose to devour this dish, it will be delicious. Enjoy!

Saturday, September 28, 2013

A late summer dessert: Pomelo Mango Papaya Sago Dessert (楊枝甘露)

Hello world! I'm sorry I haven't been active like I use to. I've been so busy with a night science class, busy working in the morning before class at night... babysitting my brother's high energy dog in between. But there has been a crazy late summer heat here in the Bay Area. This so call "Indian Summer" heat... I will welcome a nice cold winter with open arms.

But none the less, I made some nice summery desserts lately. I go out at night with some friends to some Asian (mainly HK or some Taiwan-based) dessert houses, and this is one of those popular desserts... 楊枝甘露. I don't know how to translate that, but it is basically a pomelo mango sago dessert. It is sweet, mango-y, touch bitter from the pomelo, milky, little creamy... real good served ice cold.

I don't remember how I picked the pomelo, basically make sure the fruit is heavy and firm... but if you can't find pomelo or you don't like the taste of it, you can substitute it with pink grapefruit. The pink will give the dish a nice little sprinkle of blush pink from the flesh, and will probably won't be so bitter. I find the taste of pomelo more bitter, but both fruits are quite similar in taste to me. I think this is where the mango comes in to help sweeten the dish. Nice ripe mangoes will do, whether it is Manila/Honey/Champagne mangoes or big ol' Common mangoes. I added papaya into this dish. I've seen it added and not added in some dessert houses. So this is optional. But I added it because papaya is good for you, and it adds a little something more to munch on. I chose Hawaiian papayas because when perfectly ripe, they are sweeter, texture is more solid but still have that papaya mushiness, and more floral in fragrance.

One thing I like about dessert recipes like this is that you can add as much or as as little of certain ingredients as you like. I pretty much used the recipe from GourmetTraveller88, but omitting the confectioner's sugar, but adding papaya cubes and adjusting the taste to my own and my family preference. Here is a quick wikihow on how to open a pomelo, cuz these suckers are hard to deal with. There is a special dish made with pomelo skin. My grandmother makes it, and it is delicious. It has a spongy texture, and best part for the diet-crazed individuals... it is said to be low in calorie and cholesterol... like seriously. Haha! Plus it is a humble from-the-village dish, the recipe isn't something you will find in any Chinese restaurant. Very homely. If I can catch her making it again, I'll try to get the recipe from her.

Sweet and refreshing, great for a summery day.

Ingredient:
1 large pomelo; skinned, sectioned, and flesh separated into chunky pieces
3 - 5 ripe mangoes, cubed (I used big super ripe Common mangoes.)
1 - 2 ripe Hawaiian papayas, cubed (optional)
½ - 1 cup sago
¾ cup water
1 cup coconut milk
1 cup crushed ice (optional)

How-To:
- Cook sago according to package. (I say look into Step 4 in GourmetTraveller88's recipe, linked above). Once done, set aside.
- In a bowl, peel, section, and "flake" pomelo (see above link on how to open a pomelo). Set aside into the refrigerator.
- In another bowl, peel and cube papaya. Set aside into refrigerator.
- In another bowl, cube mangoes. Reserve ½ - ¾ bowl for the next step. Set aside the rest (I say leave about 1-1½ mangoes worth, or the amount of how much you like mango) into the refrigerator.
- Taking the reserved mangoes, puree it in a blender. Add water and coconut milk, and mix to incorporate. Refrigerate to chill.
- When ready, in a large container or punch bowl, gently pour chilled mango mix in. Add sago, and mix to incorporate.
- From the fridge, gently add cubed papaya and mangoes, and pomelo flesh into mango-sago mix. Gently stir to mix.
- To serve, ladle into a cup or bowl.
- Add a bit of crushed ice for extra coldness to serve.

If you want to get extra fancy, break pomelo flesh chunks into little pearls for the dish/for garnishing. But that takes a lot of time and patience to turn a whole pomelo into little pearls, but it is nicer for presentation. But big chunks of fruit is more delicious to me. Of course, add some sugar syrup or melted-then-cooled rock sugar syrup for added sweetness if mangoes/fruits are not in season/at their ripest. It totally beats paying about $4-5 for a tiny bowl at the dessert houses. I hope you guys like it. 

Wednesday, August 28, 2013

New semester calls for super chocolatey brownies... with a chew

Long time no post everyone~ So summer semester ended, left me two weeks of freedom that was dominated by work, and then the new autumn semester began! Yippie-skippie? Not really since the new autumn semester is all microbiology at night. Granted it is only for two nights each week, but still... so much to soak in. I've already messed up a lab experiment that was done last Thursday, and didn't realize it until on Tuesday. Basically, had to redo the whole thing. Bleh~ So today's post really does help with some of the stress. When you're stressed, what is the one food everybody says helps? (At least I think it does... sometimes...)

CHOCOLATE!!!!

... And what's even better?...

Chocolate BROWNIES! 

Lol! So today's recipe was adapted from justJENN's Chocolate Mochi Brownies. What makes mine different? I added an additional half a bar of Lindt's 90% Dark Chocolate, but decreased the amount of regular milk chocolate chips for the melting process. If you don't like the taste of dark chocolate, ESPECIALLY 90% dark, then opt it out and just follow justJENN's recipe. Adding the 90% dark chocolate helps cut the sweetness, and gives it a very slight hint of that distinctive dark chocolate bitterness. Instead of evaporated milk, I think I used whole milk because I did not have any evaporated milk in the pantry. Why mine turned out more flat and chewie, rather than more brownie-like... I don't really know. Haha. May be I lacked enough or missed out on the baking soda? May be I missed out of the egg? I don't remember.

Want the know the reason why I added the 90% dark chocolate? It is a stupid reason, but its sadly true...
1) I grabbed a bar thinking it was the Fleur de Sel flavor, paid for it, ripped it open, stared at it while thinking "Why is it so... dark?" and later thought "What did I grab again?" Sniffed it (EWW! BITTER!), then silently but neatly tucked it back into the box.
2) I think I saw something online that deterred me from revisiting/attempt to try my bar of 90% dark. Someone online challenged viewers to attempt to eat a whole bar of 90% dark chocolate, and submit their disgusting video results to them. Let's just say, it wasn't pretty.
3) I finally bit the bullet when I brought it with me to a friend's house, we all looked at it, and then they questioned me... "WHY?!?!?!" Two brave souls and myself, each took a tiny nibble of one square... my gosh! It was not edible. I think it is much more bitter than drinking the bitter Chinese herbal teas... and MUCH more than just black coffee. 

... and that's my story. Now onto the recipe!


Brownies~ O(≧▽≦)O

Ingredients:
1 cup mochiko (sweet rice flour)
1 cup sugar (regular granulated white)
1 tsp baking soda
pinch of salt
4 tbsp unsalted butter
⅓ cup milk chocolate chips
½ bar 90% dark chocolate (Lindt's)
12 oz whole milk (best to have it at room temperature)
1½ tsp vanilla extract
1 egg
½ cup milk chocolate chips

How-To:
- Prep you pan with non-stick baking spray. (I forgot the parchment paper, but I used a heavy-duty non-stick pan.)
- Pre-heat oven to 350˚F.
- In a small pot, melt butter. Then add the ⅓ cup chocolate chips and the ½ bar of 90% dark chocolate, and stir until melted. Let cool a little.
- In a bowl, mix mochiko, sugar, salt, and baking soda.
- MIMI'S TIP: I saw it on foodnetwork... gently coat the ½ cup of chocolate chips in mochiko (or flour). It should help the chips from sinking to the bottom of the pan during the baking process.
- In same bowl with the dry ingredients, slowly add and mix the melted chocolate mixture, milk,  vanilla, and the egg. 
- Pour everything into the prepped pan. Sprinkle the ½ cup chocolate chip on top.
- Put into the oven, and bake for 30 - 40 minutes until center is done / the brownie gives a little bounce to the touch like regular mochi does. 
- Take out of oven, invert pan over a cooling rack (or an extra large Asian metal steaming rack), and let cool for 10 - 20 minutes.
- Cut into squares for serving.

Its all fairly easy. I made this out of whim, so I don't remember everything so clearly. But I hope everyone will try this, at least try justJENN's recipe. Enjoy and good luck guys! (^o^)/


Monday, April 1, 2013

It's Spring! Strawberries are here!

Spring is here! Sorry for my long absence. I blame my physiology class. For one class this semester, it is a headache and too much to deal with. So yeah~ I've been ignoring life, in general. The only thing that I have a little time for between class, work, and assignments are the little silliness and quick entertainment such as 9gags.

I was sitting with my cousins a few weeks ago just chillin', one of my cousins looked at me, pushed his phone's screen right at my face and with a straight blank face, and he said "Make it." I had to adjust my vision to see what the picture was of, his phone was WAY too close to my face. It was a 9gags submission of a plate of strawberries stuffed with Nutella. It looked good. So I, also with a straight blank face, was like, "Okay." Couldn't have been a better time too! I was walking home from the bus stop, looking at what the local mom-pop produce store was selling, and big boxes of ruby red giant strawberries were stacked high on the stand, and was on sale too! So the next day, I went strawberry shopping. Went home, and realized I was more than half of container out of Nutella. THE TRAGEDY! So had to walk back out to get a new container of Nutella.

I don't normally like to eat strawberries because I have bad memories of them: either they are super sour, or I get to eat them when they have been drowned in a mountain of granulated sugar to the point where they ONLY taste and feel like sugar. But I like Nutella. The chocolaty hazelnut spread is creamy, rich,  and so good on just about anything. If chocolate and strawberries has been a tried and true tasty classic combo, Nutella and strawberries will be just as tasty of a combo. The creamy and sweet chocolaty taste of the Nutella just compliments the sweet tartness of the strawberries. Oh such a perfect dessert to have as an escaping indulgent moment from reality.

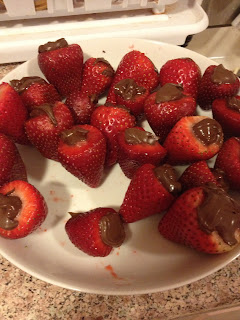
This recipe, I worked off of a photo reference on 9gags, because this recipe couldn't be easier. 2 ingredients, and it is yummy, but it is so messy.

This was one box of strawberries, and more than half tub of Nutella.

Ingredients:
1 box Ripe Strawberries
1 container Nutella

How-To:
- Wash your strawberries in a little bit of salted water, and rinse with fresh cold water.
- Pat each strawberry as dry as you can.
- With a sharp pairing knife, cut off the stem and a little bit of the top to slightly expose the core.
- With the sharp pairing knife, hollow out the core a little bit more with a gentle twisting motion to allow more room to stuff the Nutella into. *Use a bowl, a container, or over the sink to catch the juices and bits of flesh you dig out.
- Set the hollowed out strawberries to the side.
- Open Nutella, and gently mix the spread loose to a nice semi-runny consistency.
- In a zip-top sandwich bag (or if you have the fancy piping bags) in a small cup or empty jar, fill a corner of the bag with some Nutella. Twist the baggy to trap the spread in the corner. With a pair of scissor, snip off a small bit of the corner filled with the spread. Now you have a make-shift piping bag ready.
- Take a strawberry in one hand. In the other hand, take the Nutella-filled baggy, stick the open tip into the hollowed-out strawberry and gently squeeze the spread in. Top off the strawberry with a bit more if you wish.
- Repeat until all strawberries are filled.
- Serve immediately, or chill in refrigerator until serving time.

How easy was that?!?!?!?!? And let me say, my cousins each can inhale a strawberry container of these to themselves. Chilling them in the fridge until serving gives it a nice refreshing feeling. The Nutella's sweetness counters the tartness of the strawberry, which is a nice pairing. A great finisher to a nice dinner. Or even a nice simple gift to someone you care/love. If you don't want to stuff the strawberries, you can do is scoop some Nutella into a bowl and dip them for an even faster satisfaction. Hope you all enjoy this! (^-^)