Showing posts with label spicy. Show all posts

Monday, October 21, 2013

Chilly weather? Warm up with Spicy Pork (Jeyeuk Bokkum)!!!


Ah~ Finally, the Bay Area is cooling down. I like it! I can finally bust out all my winter fashion and enjoy the cold weather's charm and fun. Some reason, cold weather makes me think of Korean BBQ and/or apple cider. Strange combination... but both majorly delicious. So neglecting to do a hardcore study session for my 2nd microbio exam (which no doubly, I bombed), I decided to do hardcore research into some yummy recipes I can try my hands on (reason for exam failure is because of that).

Do not overlook where you may find an interesting recipe. This month of October, I suddenly fell into a Korean BBQ type of mood. But thinking about Korean food makes me think of all the prep work involved, and that deters me from cooking Korean dishes. Strangely enough during work, I had a small down time and decided to kill it with browsing through some newly delivered magazines before I place them into the waiting room (I work in a doctor's office). I came across a copy of Men's Health (the manly version of Cosmo?), seeing Joseph Gorden-Lovett's smiling cuteness gracing the covers, I decided to flip through. About to give up from all the overload of testosterone-filled-machismo-handsomeness, I managed to flip to a small article about cooking. Closer inspection, it was about cooking Korean food. Much closer inspection, it was about cooking spicy pork (Jeyeuk Bokkum)! Bonus, it was pork belly meat! Being that it is a magazine tailored towards men, it only means that everything was spelled out simply... EASY TO DO! No fuss, No mess. (I'm sorry, I can't seem to find the recipe on Men's Health website. I only have it via hardcopy from the October 2013 issue if you are interested.)

My recipe is adapted and unaltered from that particular issue, therefore I will credit to whom they credited: chef Hooni Kim of Hanjan restaurant in NYC. Only thing I did was double the quality (cuz I cook for a squadron of people, but if you are making for less people or like sensible sizes, just cut the amount by half) and added greeneries (I added zucchini and lettuce... because it was just sitting there in the veggie bin at home, beckoning to be cooked). This is pork belly meat... yes that means bacon. Don't want to forfeit your precious pork belly meat? Buy the pork belly at a good butcher shop, and try to ask for a leaner cut with less fat on it, or you can trim the excess at home yourself. There is a momentary need to wait overnight before eating this dish because of the marinating process. The wait will definitely be worth it. Now... Onward!!!!


Spicy pork belly, two ways: spring roll-style and traditional lettuce leaf wrap

Ingredients:
2lb pork belly slices (unsmoked, halved widthwise, and trimmed of excess fat)
1 large onion (halved, and sliced thinly)
6 tbsp Gochujang
6 tbsp soju (I used Jinro Chamisul. Japanese sake works too)
6 tbsp soy sauce
2 tbsp Mirin
2 tbsp sesame oil
2 tbsp sugar (regular white granulated is fine)
5 - 6 cloves garlic (finely minced)
1 nub ginger (about more or less the length of your thumb, finely minced)
3 - 4 zucchinis (halved widthwise, sliced lengthwise)
salt to taste
1 - 2 head of red leaf lettuce (Destalked into individual leaves, washed, and dried; optional)
1 package rice paper wrap (optional)
Cooked jasmine rice (optional)

How-To:
Night before...

- Prep everything, and then mix items #3 - #10 in a big mixing bowl.
- Add spicy mixture, pork belly slices, and sliced onions into a big gallon-size zip-top bag, squish around to evenly coat meat with spicy mixture, and allow to marinate overnight in refrigerator.

Next day...

- Prep your vegetables.
- Heat a large pan with a touch of sesame oil, and cook zucchini slices. Add a touch of salt. On a plate, transfer cooked zucchini and set aside.
- Using same pan, DO NOT ADD ADDITIONAL OIL (your pork belly will provide it), pan-fry in batches of the pork belly slices as you would bacon until throughly cooked. Do so with all or as much of the pork belly slices as you desire.
- Once done pan-frying pork belly slices, in same pan, add in the cooked zucchini and cooked pork belly. Toss to throughly mix both ingredients, so everything gets smothered in the spicy red sauce. Plate and serve!

Eat it wrapped in the lettuce leaf. As my uncle suggested, wrap the spicy pork in the lettuce leaf, and then wrap it in the rice paper/spring roll wrap... kind of like the Vietnamese fresh spring roll. To use spring roll rice paper wrap, just take a sheet and dunk it in some luke warm to hot water (careful, okay? It is hot water) until it is malleable. Or nix the lettuce leaf and just eat it with the rice paper wrap. Or 86 the wrap-gears and go old fashion with a big bowl of hot, fluffy cooked rice. Which ever way you choose to devour this dish, it will be delicious. Enjoy!

Tuesday, January 15, 2013

Wintertime means Kimchi time: Radish and Napa Cabbage

Okay, so with back-to-back holidays, filling-in for my manager for 2 weeks, and just wanting to make time for myself... yes... I ignored this blog for a bit. So, I'm sorry. To make up for it, I'm putting up 2 recipes. Both... kimchi related: Kakdugi (radish kimchi) and Kimchi (napa cabbage kimchi).

Super long post time!

Something about wintertime and the season for napa cabbage harvesting, I really thought about kimchi. I remember some of my friends tell me to make kimchi... I didn't get why then, I didn't really like kimchi then either... two words: Kimchi Breath. But... I had a change of heart with this winter season's super cold weather and seeing so much napa cabbage on sale in the markets.

My family loves kimchi. The spicy kick. The garlicky aroma. A bite of something savory, while enjoying the veggie's sweetness. My cousin, oldest of two, discovered how delicious it is over a simple bowl of hot, fluffy white rice. My uncle and my cousin likes this one place on Geary St, their kimchi is fresh, sweet, crunchy, and a bit spicy. It was more or less recently, my uncle said, "Man, I think making kimchi would be cheaper than constantly purchasing it." So... I bit the bullet and said, "I'll try to make kimchi."

*A lot of referencings (image and step by step) will be from Maangchi.

I basically followed the recipe to Maangchi's Napa Cabbage Kimchi. I like her pic-by-pic on how to prep kimchi through her Easy Kimchi Recipe, as well. The only difference I did from her's is that I totally omitted the raw oyster/squid. My family is very cautious about cholesterol, and seafood is always red flagged. But overall, the taste is still the same. My recipe will make about 6 liters of kimchi (yeah, I went out and got a 12 liter kimchi container at the Korean market, JUST for making kimchi), and lunchbox-size of kakdugi.

* Mimi's Tip: How to pick a good napa cabbage. *
I use to pick one that is huge and green. WRONG! Turns out, it isn't how green it is, but how yellow it is. Yellow leaves mean young tender leaves. Very much like the inner core of the napa cabbage. So pick one that has more yellow-green leaves. As few blemishes like dark spots/"freckles". Tight leaves. Make sure that the head of cabbage has a good weight to it. You should be good to go. If all else fails, you can totally ask the workers in the produce section to help. I give 2 thumbs up for the super great help from the guy in the Korean market.

Not exactly the best shot, but dang was it good.

Ingredients:
5 large heads of napa cabbage (quartered into wedges)
1 small Korean radish; 1/4 julienned (3/4 cubed reserved for Kakdugi)
1 medium carrot; peeled and julienned
2 bunch asian chives; cut into about 2" sections
1 bunch green onion; cut into about 2" sections
1 small onion
1 handful of garlic
1 cup Mochiko
3 - 4 cups water
1/2 cup sugar (plain white granulated)
1 cup fish sauce
Lots of sea salt/kosher salt (I used sea salt, it didn't turn out salty, just a light taste)
3 - 4 cups hot pepper flakes (I use Wang: Maewoon Gochu Gaaroo)

How-To:
Salting Napa Cabbage:
- Clean, trim, and quarter napa cabbages. In a large bowl/roasting pan, start salting EACH leaf. Let stand for about 1hour and 30 minutes, rotating each wedge of cabbage every 30 minutes.
- Once time is up, rinse out each wedge of cabbage under cold water. Takes about 3 washes to get the salt out. Squeeze out the excess water. Set aside to dry a bit.

Kimchi Paste: 
- In a food processor, puree garlic and onion.
- In a medium pot, cook Mochiko with water and sugar until thickened (about glue-consistancy).
- In a large bowl, pour out garlic-onion puree and Mochiko mix.
- Add in julienned carrots and radish. 
- Add chives, green onions. 
- Add hot pepper flakes.
- Add fish sauce.
- Mix everything in the bowl.

Napa Cabbage Kimchi:
- Strap on some gloves and roll up your sleeves! Its time to apply a good smear of the kimchi paste mix to the cabbage... LEAF BY LEAF! Put each freshly "painted" cabbage wedge into an airtight container. Make sure to place each wedge tightly together, and to press out as much air out of the kimchi mass. You want to make sure that there is no pockets of air that can have bad bacteria form during fermentation.
- Eat right away, or you can put a layer of plastic wrap on the kimchi to cover it for more protection and refrigerate to ferment. 

...

Great, do you have some leftover kimchi paste? Remember that reserved bit of radish?

As soon as I finished making it, it was eaten up.

How-To:
Salting Radish:
- Cube leftover radish.
- In a bowl, sprinkle with enough salt help draw out the extra water in the radish cubes. Toss to coat evenly.
- Wait about 1 - 1.5 hours, stirring the radish every 30 minutes.
- Rinse out under cold water, about 3 washes to take out the saltiness.

Kakdugi/Radish Kimchi:
-In a clean airtight container, pour leftover Kimchi Paste over radish. Mix. Eat right alway or put into fridge to ferment.


Done. That's it. Pretty easy overall. The hardest part is the wait time during the salting process. I had a lot of fun making it.  Fresh kimchi is sweet and crunchy. Fermented kimchi spicier, bit saltier, while still crunchy. I hope you guys try your hands on making your own kimchi. Enjoy!

Monday, October 17, 2011

Spicy! Kimchi Fried Rice... FULLY LOADED!

OMG... My deepest apologies. I've been absent for almost 3 months. How embarrassing! *run away to hide* 三(  ´Д` ) To make it up... I know I have been saying to some of my friends that I will put up the recipe for Kimchi (aka "Kimuchee"... I think I heard it from my friend KC as she was venting about how some people can't say it right? IDK) Fried Rice. Now, I don't really eat rice, but this was the very first recipe I learned about to make in my cooking journey... and I tried my best to make it better every time I do make it. It has literally been a long time since I last looked for the recipe, I wish I can credit someone for this, but it has literally been a while since I last searched and I don't remember. But in all, I credit all the wonderful people who took the time to put up their recipe for us to search.


"Fully Loaded"... why? Because I put hella stuff in it. Meat, loads of veggies, egg... it has been my go-to dish when my family "orders" it. I must say I changed the dish just a bit... not by a lot. Traditionally, the dish is TOPPED with a fried egg. Mine has scrambled egg mixed in. Traditional... I don't know if they have cucumber and carrots in it, but mine do! XD Omit and add to your taste... it is fried rice after all. Its kind of like a sandwich, you put what you like in it... that's what I think. XD


hello.mimi's TIP: When making this... it is best to use overnight rice! Yes... overnight rice, as in the leftover rice from a night before or so. Fresh rice is good, but after cooking it tends to be mushy. Overnight rice is best, because you have let the cooked rice to sit and cool, letting it soak up the water and moisture. Therefore, it is cooked and still soft but with a little bite. BUT IF YOU DON'T HAVE OVERNIGHT RICE, TRY THIS -> cook your rice ahead of time, BUT LET COOL FOR AT LEAST 2 HOURS PRIOR TO MAKING FRIED RICE!!!! Trust me, it works... or at least trust my Grandma.


My recipe makes for one big wok. Note about the kimchi and kimchi juice... the ones I get are from the Korean market's deli section, so they come in a box. I find it hard to put into measurement as to how much kimchi juice I would use. Basically, the kimchi juice is for added spiciness. And how I measured my use of kimchi juice is by the box... I basically used about 1 - 1.5 box of kimchi juice, take to account that the market does not fill the box entirely... so eye-balling it if the box does not have kimchi in it, I would say I used about 1 cup of the juice... but adjust to your taste.


*drool*

Ingredients:
4 - 5 cups cooked rice
1 - 1½ cup kimchi (sliced with kimchi juice, reserve the kimchi juice on the side about ½-1 cup if you can)
1 - 2 tbsp Korean hot pepper paste (I used Haioreum brand gochujang)
1 - 2 big cloves garlic (minced)
1 tbsp soy sauce
½ a large onion (diced)
1 tbsp sesame oil
½ pound ground beef (quick marinade with a little bit of soy sauce, sugar, and salt... or cheat and use pre-marinaded bulgogi at the Korean market)
3 - 4 eggs (scrambled... omit if topping with a fried egg)
1 cucumber (diced)
1 carrot (diced)

How-To:
- In small pan with a touch of oil, beat and scramble the eggs. Remove and set aside.
- Heat wok with sesame oil, add garlic and let brown. (Omit this step if using pre-marinaded bulgogi.)
- Add ground beef to wok and brown throughly.
- Add rice to wok, stir to incorporate beef. Let stand for a little bit to let rice brown if want crunchy bits of rice.
- Add kimchi, about 1/2 cup kimchi juice first, gochujang, soy sauce, onion, scrambled eggs, cucumber, and carrot into wok.
- Stir to incorporate everything. TASTE (it is very important)! Adjust with reserved kimchi juice to desired level of kimchi flavor. Salt or a tad bit more of the gochujang (this is what is providing the salt in the dish) is needs more salt.
- If want, let fried rice a stand a little to achieve a little bit of crispy burnt rice with occasional stir... but after mixing to incorporate everything, it is ready to be served.

Phew~ that was a lot right? But it is delicious. I hope you all try the recipe. Good luck! (^-^)b

Wednesday, June 29, 2011

Dynamite!... Part 1: Spicy Baked Mussels

This is a recipe I love to make. Its simple, but... it isn't something I would recommend eating all the time. But it goes great with rice, or just as a simple "happi"tizer. =P

I have another recipe for "Dynamite," but that's for next time. But today, I have Dynamite: Baked Mussels. I want to thank my friend, THARY!!! for this recipe. It was yummy, and thanks for teaching me how to make it. Sankyu, Supermodel! (^.^)o ~You are love.

So what is Dynamite? Well... Explosion? Lol! But seriously, I think the name comes from the spiciness the dish has. I'm not sure the origin of the dish, but most likely a Japanese/Asian American recipe. Srirachi (the most recognized Asian "tabasco" brand) and mayonnaise... but no, not just any mayonnaise will do. No sir~ you need Kewpie Mayo. What? That's right! Kewpie Mayo <- click the link if you have never seen it before. What's the difference between this mayo and regular mayo? Kewpie has a sweeter taste, as to regular mayo like Best Foods or Miracle Whip has a tangy taste. Only difference. But you can find the hot sauce at any Asian supermarket (and I think mainstream supermarkets like Safeway carries it now). Kewpie mayo can be a little difficult, I tried my local Chinese/Vietnamese-based supermarket and they didn't have it. But then I went to my local Japanese-based and Korean-based supermarkets, and they have it. So don't despair if you can't find it in one place, try another. If you really can't find it... buy online? Or just try using regular mayo (I never tried it though, because I only have Kewpie in my fridge).

I changed the recipe ever so slightly by adding small bay scallops (click for little picture and description from Pike Place Fish Market), and lots of Tobiko (way smaller than ikura, way bigger than masago. Read this quick wiki for more detail and images). You can have both Tobiko and Masago in the recipe, it just adds different depth of crunch that tiny fish eggs gives when you munch into them.

*My color chart of Sriracha to Mayo mix Spicy level:
Light peach = more mayo than Sriracha -> Not spicy
Peach = little more Sriracha than mayo -> not spicy but has a light Sriracha taste 
Peachy-salmon = bit more Sriracha than mayo -> a good kick of heat
Orangy-pink/beyond = More Sriracha than mayo -> Spicy!


Don't that just look awesomely delicious? "Happ"itizer!

Ingredients:
2 dozen mussels on a half-shell (New Zeland green lips are the best)
1/2 - 1 cup bay scallops (optional)
1 tbsp milk (my friend used milk, some recipes says half and half, but I used heavy cream. All works same.)
1 pinch hon dashi (Dashi "MSG" pellets (my opinion of course)! Curious? Read at Kobi's Kitchen.)
3/4 cup Kewpie mayo
1/4 cup Tobiko (remember to reserve some to garnish)
Sriracha (add enough to your own taste)

How-To:
- Clean mussles, and wash bay scallops. Drain to dry. Cut scallops in half or quarter.
- In a bowl, add milk/cream and hon dashi. Mix to dissolve the pellets.
- Add mayo. Mix to incorporate into the milk/hon dashi mix.
- Add as much Sriracha as you like. *(See my color chart of spicy above) Mix. 
- Add some Tobiko, and add some scallops (if using). Mix.
- Pre-heat oven to 350˚F.
- Line a pan with aluminum foil, top each clean mussel with some mayo-scallop mix, and sprinkle some more tobiko.
- Place mussel-filled pan into the oven, and bake for 15 - 20 minutes depending on oven (or until scallops are cooked... if using scallops of course).
- Make sure you rotate the pan of mussels every 5 minutes for even cooking.
- After 15 - 20 minutes are up, take out of oven and enjoy!

Hella good, I say. This is a must try, because there is so little ingredients needed and so simple to put together. Please enjoy guys! d(^_^)b

Thursday, June 16, 2011

Long Overdue: Soon Doobu! (without the hot stone pot)

Hey everyone! I'm sooooooo~ sorry! I've been 1) lazy, 2) lost internet around at home, 3) micro SD reader died, and 4) just got a new one and is bumming internet connection at my uncle's house. Loving my new USB reader... cuz 1) its pink, and 2) IT ACTUALLY  WORKS!... Not bad for $2 from Ichiban Kan. XD 

Anyways... ON TO THE FOOD!!!!! (o > Д<)

So as I had promised, Soon Doobu (Spicy Tofu Stew/Soup)! Story? Ummm... Okay~? *Thinks*... My mom and I are the only ones who eat it when we get a stone pot of it at Korean BBQ places. The only time we eat spicy tofu soup is when we go to K-BBQ... and it was only a treat. And how often do we eat K-BBQ? Once or twice a year for special occasions, and sometimes never! So! I was like "Mom! I'm going to learn how to make Korean tofu soup... you know, the spicy one from the BBQ places." My mom was so happy... then again, she's happy whenever I say I'm going to make food. 

I make this often when I first learned it... now... not so much. I don't want to get bored of it, ya know? I love spicy tofu stew/soup. I know its summer right now, and who in their right mind would be eating hot soup now? Well, Winter is only around the corner, and being that it is San Francisco... anytime is a good time for a bowl of hot/warm soup. But definitely great for Winter... especially a rainy Winter. A big hot bowl of spicy red broth, little bits of broken up tofu, chunks of veggies, a nibble of meat and seafood.... oh yum~! I learned the recipe from Maangchi, but altered the veggies to match the ones I eat from the BBQ places. Little more steps, a little longer to make, but it is well worth it if you love this soup/stew as much as my family and I do. Bit of caution though... do a little research before making. According to Maangchi (and I highly suggest reading her blog on hot pepper flakes), there is 2 types of hot pepper flakes: Maewoon Gochu Gaaroo (very hot) and Deol Maewoon Gochu Gaaroo (less spicy). Personally, I used the brand Wang in Maewoon. And according to Maangchi, there is a ranking of spiciness in tablespoon-form (keep this in mind for later)... it goes like this:

Pepper Flake Table of Spiciness
2 tbsp = mild
3 tbsp = medium
4 tbsp = hot
5 tbsp = SUICIDE!  Σ(;>Д<;;)o

Personally, I go beyond 5 tbsp, about 7 tbsp... and it isn't so suicidal at all. Then again, my family likes spicy food. So experiment how hot your tongue can take, just don't start off with 5 tbsp right off the bat when making this. ALSO, I don't use the screaming hot stone pot what this dish is normally cooked in. I just use regular everyday pots. But use a pretty big pot for Pot #2: Everything Else. My recipe has lots of stuff in it and can overflow easily. But just be careful. (^-^)


Really wish I made the shot look better, but this was the best I could get while holding my family (whom were getting snappy) back from devouring it as soon as the pot got to the table.

Ingredients:
stock:
12 dried anchovies, "gutted" (check Maangchi for how anchovies look like and to "gut" is to remove the belly and dark nub in the cavity)
1/3 cup dried kelp (soak off excess salt in warm water)
1/2 onion
5 cloves garlic
3 caps large dried shitake or 6-7 caps small dried shitake (partially rehydrated)

everything else:
2-3 large zucchinis, washed, peeled (optional), and cubed
1 stalk large leek, washed (to get out the sand) and chopped
1/2-1 medium onion, diced (optional, but I added it for more stuff to eat)
1-2 jars medium oysters (optional, or you can use other types of seafood)
1/4 pounds (or less) beef, cut into bite size strips or pieces (I use flank steak, cut on a bias)
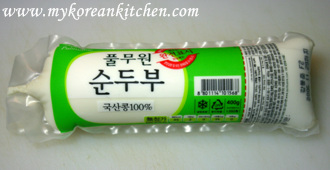
2-4 tubes tofu (Unfamiliar with tofu in a tube? Click the link from My Korean Kitchen for image, or substitute with regular silken tofu)
2-5 tbsp Korean hot pepper flakes (I used the brand Wang: Maewoon Gochu Gaaroo)
2 tbsp fish sauce
salt (to taste/optional)
egg (optional to crack into your soup)

How-To:
Pot #1: stock
- In a cheese cloth bag, add gutted anchovies and kelp.
- In a medium pot filled with water (about 5-6 cups worth), add cheese cloth bag, onion, garlic, and dried shitakes.
- Boil on high heat for 10 minutes.
- After 10 minutes, lower heat to medium-low and let simmer for 20 minutes. (Tip: half-cover pot with lid to prevent boiling over)
- After 20 minutes, fish out shitake to let cool for handling and chop into pieces, and set aside pot of stock.

Pot #2: everything else
- In a large pot (and I mean LARGE), add a touch of oil (or sesame oil for a punch of flavor), and cook beef.
- Add shitake, leek, zucchini, and onion. Stir ingredients to brown a little.
- Add hot pepper flakes. Stir to coat everything... it should look like a bit mass of red blobs.
- Ladle in 2-3 scoops of stock. CAUTION FOR SIZZLING! Once sizzling dies down, ladle in the rest of the stock into the pot or as much that the pot can take (REMEMBER TO LEAVE ROOM FOR MORE INGREDIENTS AND TOFU!). Stir so everything is bathing in the brothy goodness.
- Add the oysters or seafood.
- Add fish sauce.
- Give a little stir. (Be gentle if using oysters, don't want to break them.)
- Add tubes of tofu into pot. Gently break tofu with ladle or spatula (whatever you're using to stir the pot). It okay if some tofu pieces are bigger and some smaller.
- Let boil a bit, so the flavors can marry and be yummy.
- Give it a taste, and add a touch of salt if needed.
- Serve in a bowl with raw egg, or eat as it plain!

Whoo~ that's a lot right? But its so good. If you want more heat in your food and the hot pepper flakes just isn't cutting it, add a few slices of fresh jalapẽnos before or after adding tofu. I hope you all will try this recipe! Please enjoy! o(^-^)o

Monday, May 9, 2011

Its been a while... Time to spicy things up!

I'm so sorry for not being active for the ENTIRE month of April. I've really been swamped with projects and school papers. But! I do have a recipe that's actually quite good... in fact, it kind of got me through most of the month.

Between studying, work and school... I only have time for sleep and zombifying in front of the TV... which means more sleeping. But if you can make a BIG pot of this and eat it over the week. Yeah, I'm kind of sick of it... but you can really change up this recipe so you won't die of repetitive taste.  I personally added olive slices into it to give it more color and... I like olives. I got the recipe from The Perfect Pantry.

Spicy, meaty, and overall yum. It is spaghetti with a slight Asiany twist to it because the recipe calls for "Chicken" Brand spicy garlic chili sauce... the same makers of Sriracha... instead of the usual tomato-based  sauce. Originally, this dish looks kind of bland... the color of cooked meat with a tinge of red from the garlic sauce. So! I changed it up by adding a can of pre-sliced black olives, and changing the pasta shape to a mini (piccolini) faralle shaped pasta. It is cuter I think. I've been meaning to add a small can of chopped or diced tomato... fresh is nice, but sometimes you just don't have the time to dice tomatoes. Semi-homemade guys... it is your friend when time is too tight for cooking.


Eww... my phone's camera failed this time... please excuse it's failedness.

Ingredients:
1/2 - 1 box of piccolini farfalle or any type of pasta you like
1 pound lean ground beef (I used 93/7 for an extra healthier option)
1 clove garlic, minced
1/2 - 1 onion, diced
1 pack white button mushrooms, sliced.
6 tbsp soy sauce
4 tbsp oyster sauce
2 tbsp garlic chili sauce
salt (optional)
green onion, sliced for garnish (optional)

How-To:
- Boil pasta as directed on the box in a big pot of water. Remember to salt the water!
- In a pan or wok, add a touch of oil and brown garlic to make the oil fragrant, and cook onion until translucent. 
- Add ground beef, and cook throughly!
- Add mushroom.
- Cook until everything is throughly cooked through, the pan will be filled with a bit of water from the mushrooms and onion releasing their liquids, so don't freak out! Its good and tasty water. XD
- Add the soy sauce, oyster sauce, and garlic chili sauce into pan. Stir to mix. Add as much or little garlic chili sauce to your own liking. Don't be afraid to adjust to your own taste.
- If using canned sliced olives, open can and drain olives before cooking beef. Add it to the pan after sauce, and mix to incorporate. (Same for if you plan to use canned diced tomatoes.)
- Remember to taste your food! Add salt if it is not savory enough.
- Plate, top with green onions and enjoy!

Like the website is called, this dish really can be made and found in your pantry... all ingredients minus the beef, I mean. Haha! If pre-made at the beginning of the week and in a big batch, it's great for nights you don't want to cook or have no time to cook.

Good luck to you!